Procmon의 몇 가지 기능에 대해서 정리해봅니다 1. Configure Symbols Option에 있는 것인데 Dbghelp.dll path를 선택해주면 Event Properties에서 Stack 탭의 Location에 함수 이름이 나오기 때문에 어떤 식으로 동작하는지 확인을 할 수 있습니다 위 그림처럼 WDK의 설치 경로에 있는 것으로 하였는데 기본 경로는 system32입니다 바꾼 이유는 version이 6.0 이상이어야 하는데 최초 설치시 버전이 5.x 라서 함수 이름을 확인할 수가 없습니다 그래서 msdn에서 WDK를 설치하고 그 경로에 있는 DbgHelp.dll을 사용하였습니다 위 그림처럼 Location에서 함수 이름을 확인할 수 있습니다 2. Filter의 Enable Advanced Output 입니다 활성화 하면Operation에 IRP_MJ 또는 FASTIO가 추가되고 Detail Column에서도 결과가 추가됩니다 3. 글꼴은 대부분 아는 부분입니다 맑은 고딕, 굵게, 10 으로 설정해주니 개인적으로 눈이 편합니다
프로젝트 만들 때 솔루션 디렉토리를 생성하고 Dll 프로젝트와 Test Dll 프로젝트를 생성한다 Test Dll 프로젝트는 MFC 응용 프로그램에서 다이얼로그 기반만 설정하고 마침한다 Dll 프로젝트는 MFC 확장 DLL만 설정하고 마침한다 Dll 프로젝트에서 Dll과 App에서 사용할 공용 헤더를 추가한다 Dll.h class A { public: virtual int AddInteger(int A, int B) = 0; virtual void destroy() = 0; }; Dll.cpp #include "stdafx.h" #include "Dll.h" #include <iostream> #ifdef _DEBUG #define new DEBUG_NEW #endif using namespace std; class B : public A { public: B() { cerr << "B constructor\n"; } ~B() { cerr << "B destructor\n"; } int AddInteger(int C, int D) { return C+D; } void destroy() { delete this; } }; extern "C" __declspec ( dllexport ) A* create_b () { return new B; } Test_App의 Dlg.cpp 에서 Dll.h 파일을 include 하고 테스트용으로 만든 버튼에 HINSTANCE hDll = NULL; hDll = LoadLibrary(L"Dll.dll"); if(hDll == NULL) { OutputDebugString(L"dll load fail...
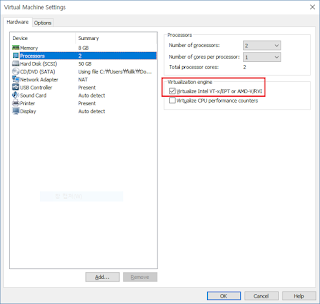
환경 구성 VMware : 14 Ubuntu : 16.04.4 LTS https://www.ubuntu.com/download/desktop 안드로이드 스튜디오 : 3.1.0.16 https://developer.android.com/studio/index.html#downloads 1. vmware 구축 Processors 설정에서 Intel VT-x/EPT or AMD-V/RVI 를 체크(안드로이드 스튜디오에서 가상 에뮬레이터를 동작하기 위해 필요한 것) 2. 우분투 설치 vmware에 우분투를 설치할 때 언어와 지역 설정을 영어와 미국으로 한다 이유는 여기를 참조 : http://hanmaruj.tistory.com/5 결론은 설치 후 언어 팩을 한국어로 설치해서 적용한다 2.1. 키보드 설정 여기에 한글/영어 키보드 설정에 대해서 참조 : http://blankspace-dev.tistory.com/229 3. 안드로이드 스튜디오 설치 우분투 설치가 완료되면 안드로이드 스튜디오 설치할 때 공식 문서를 참조 : https://developer.android.com/studio/install.html


댓글
댓글 쓰기